
How to Survive on One Income After Baby: Part 1

My Biggest Trick to Saving More Money

How to Spend 4 days in Charleston, SC
The hubby and I just spent four marvelous days in Charleston, South Carolina. It was a much needed break from the regular grind of our everyday lives. With a new puppy and baby on the way, a few days away from responsibility, agenda, and the Minnesota cold were exactly what the doctor (or midwife in my case!) ordered.
We chose Charleston because we heard it was a laid-back city with a great food scene. And the weather is obviously warmer than it is back home for us. That was all we needed to book the trip and go. Between my flight voucher I still had to use up and the husband's frequent flier miles, we were able to fly basically for free, which is always a bonus. In addition, staying at AirBnB's over hotels freed us up some money to use towards eating delicious food. Which you can sure bet we ate a lot of!
Here's a rundown of our itinerary, including and most importantly, what delicious morsels we devoured along the way:
4 Days in Charleston, South Carolina
Day 1 (Saturday):
Arrived late and took a Uber to our AirBnb in Mount Pleasant. Was a one bedroom decorated in the most elegant way. According to the husband, it had one of 'prettiest bathrooms' he had ever seen. There were not one but TWO chandeliers in the bathroom!

I was loving on the marble statue in the center. This bathroom is more elaborate than my entire house combined!

I so wish I would have taken advantage of this bathtub - it's so big and beautiful!
After sleeping for a few hours we got up and took an Uber to Sullivan Island. There we walked along the beach. It was sunny and in the 70s, and my heart was rejouicing!

Look at those curly bangs!
After our nice stroll we had lunch at The Obstinate Daughter. Highly recommend for the food, atmosphere, and service. We split the shrimp roll with geechie grit frites and the shrimp arugula pesto pizza with olives, grilled artichokes and lemon. Both were delicious, but the shrimp roll and those frites were out of this world!

Fries made of grits, who would have thunk?!

Helloooo herby shrimpy deliciousness.
After another walk on the beach, we took another Uber up to Boone Hall Plantation. We took a open-air tractor ride (well that's what we would call it here in MN!) around the grounds to see all of the crops they still plant. It's still a major farm, and was really cool to see where they put everything and how it grows. Afterwards we toured the house, which was featured in the Notebook as well as a few other TV shows/movies. It was interesting to hear all about the history of the plantation, who it's owners were/are, and learn more about the role slaves played during different periods of time.

Do you remember this house from the Notebook?

I captured a picture of the sunset and this tree, which is between 400-500 years old!
After our trip to Boone Hall Plantation, we took another Uber back to our place and got ready for the night. We had dinner reservations at Butcher and Bee. We ordered the warm bean dip with their homemade pita bread, cauliflower with green tahini, curried cashews, and pickled raisin, and bacon wrapped dates for starters. First course was crispy sweet potatoes with tamarind chutney, yogurt, and cilantro. Main course we split the Whole Grilled Sea Bass with turmeric coconut curry, chickpeas, and Israeli couscous. The fish and that curry sauce was some of the best I've had. But I could have even just had the chickpeas and couscous with the curry, it was that good. We also had a custar-like dessert with local strawberries and meringue drops that was fabulous.
Day 2 (Sunday):
We moved Airbnb locations this day, so after we got up/ready we took an Uber into downtown Charleston where we were staying to drop off our bags. From there we went to brunch at Poogan's Porch. We had the she crab soup (crab soup with sherry vinegar- our Uber driver told us we had to try it once!) and biscuits and gravy to start. The biscuits were so fluffy and light and the gravy was not too thick with big chunks of sausage in it. Best biscuits and gravy to date.

She crab soup. Not to be confused with He crab soup. :)

Are you drooling yet?
After that we split the Tennessee Hot Chicken and the Shrimp and Grits. The chicken was perfectly crisp on the outside and so juicy on the inside. It was served with blue cheese Brussels sprouts slaw and a brioche bun and was so SO good! Of course we didn't snap any pictures as we dug right in.
From there we walked the downtown area to explore. So many beautiful homes and so much history in that area. We stumbled upon Christophe Artisan Chocolatier-Patissier and indulged in some drinking chocolate and treats. The hubby had these fruit bites made of pureed fruit (apricot and strawberry) and rolled in sugar, and I had a earl grey dark chocolate truffle.

Forgot to snap a pic till after I took a bite....naturally. Look how pretty the shell on this earl grey dark chocolate truffle is!
After making it home, we got ready and headed out to an early dinner at Rodney Scott's BBQ. They were out of a chicken, ribs and cornbread (what I really wanted!), but we had some pulled pork, mac and cheese, coleslaw, hush puppies and beans. The beans were phenomenal, but other than that, nothing I would go back for. We've had just as good of BBQ here in Minneapolis. It's likely you could find other/better places in Charleston, and I'm sure there are some good ones out there. Either way - if you go, I wouldn't necessarily waste your time/money at this place.
From dinner we headed to Charleston Pour House which had a funky hippie vibe. The outdoor bar was open and there was a great band playing. People with dreads and bell bottoms everywhere. The best part? You can bring your dog! There were several dogs running around chasing/playing with one another. My dog loving hippie spirit was in heaven.
Day 3 (Monday):
Monday we woke up and stopped at the famous Callie's Charleston Biscuits for a few biscuits. We sampled almost every kind they had (6 total) but our favorite weren't the buttermilk biscuits themselves, but the shortbread ones. Especially the shortbread with blackberry preserves inside. One of the most delicious bites of biscuit I've eaten. Hubby seconds that.
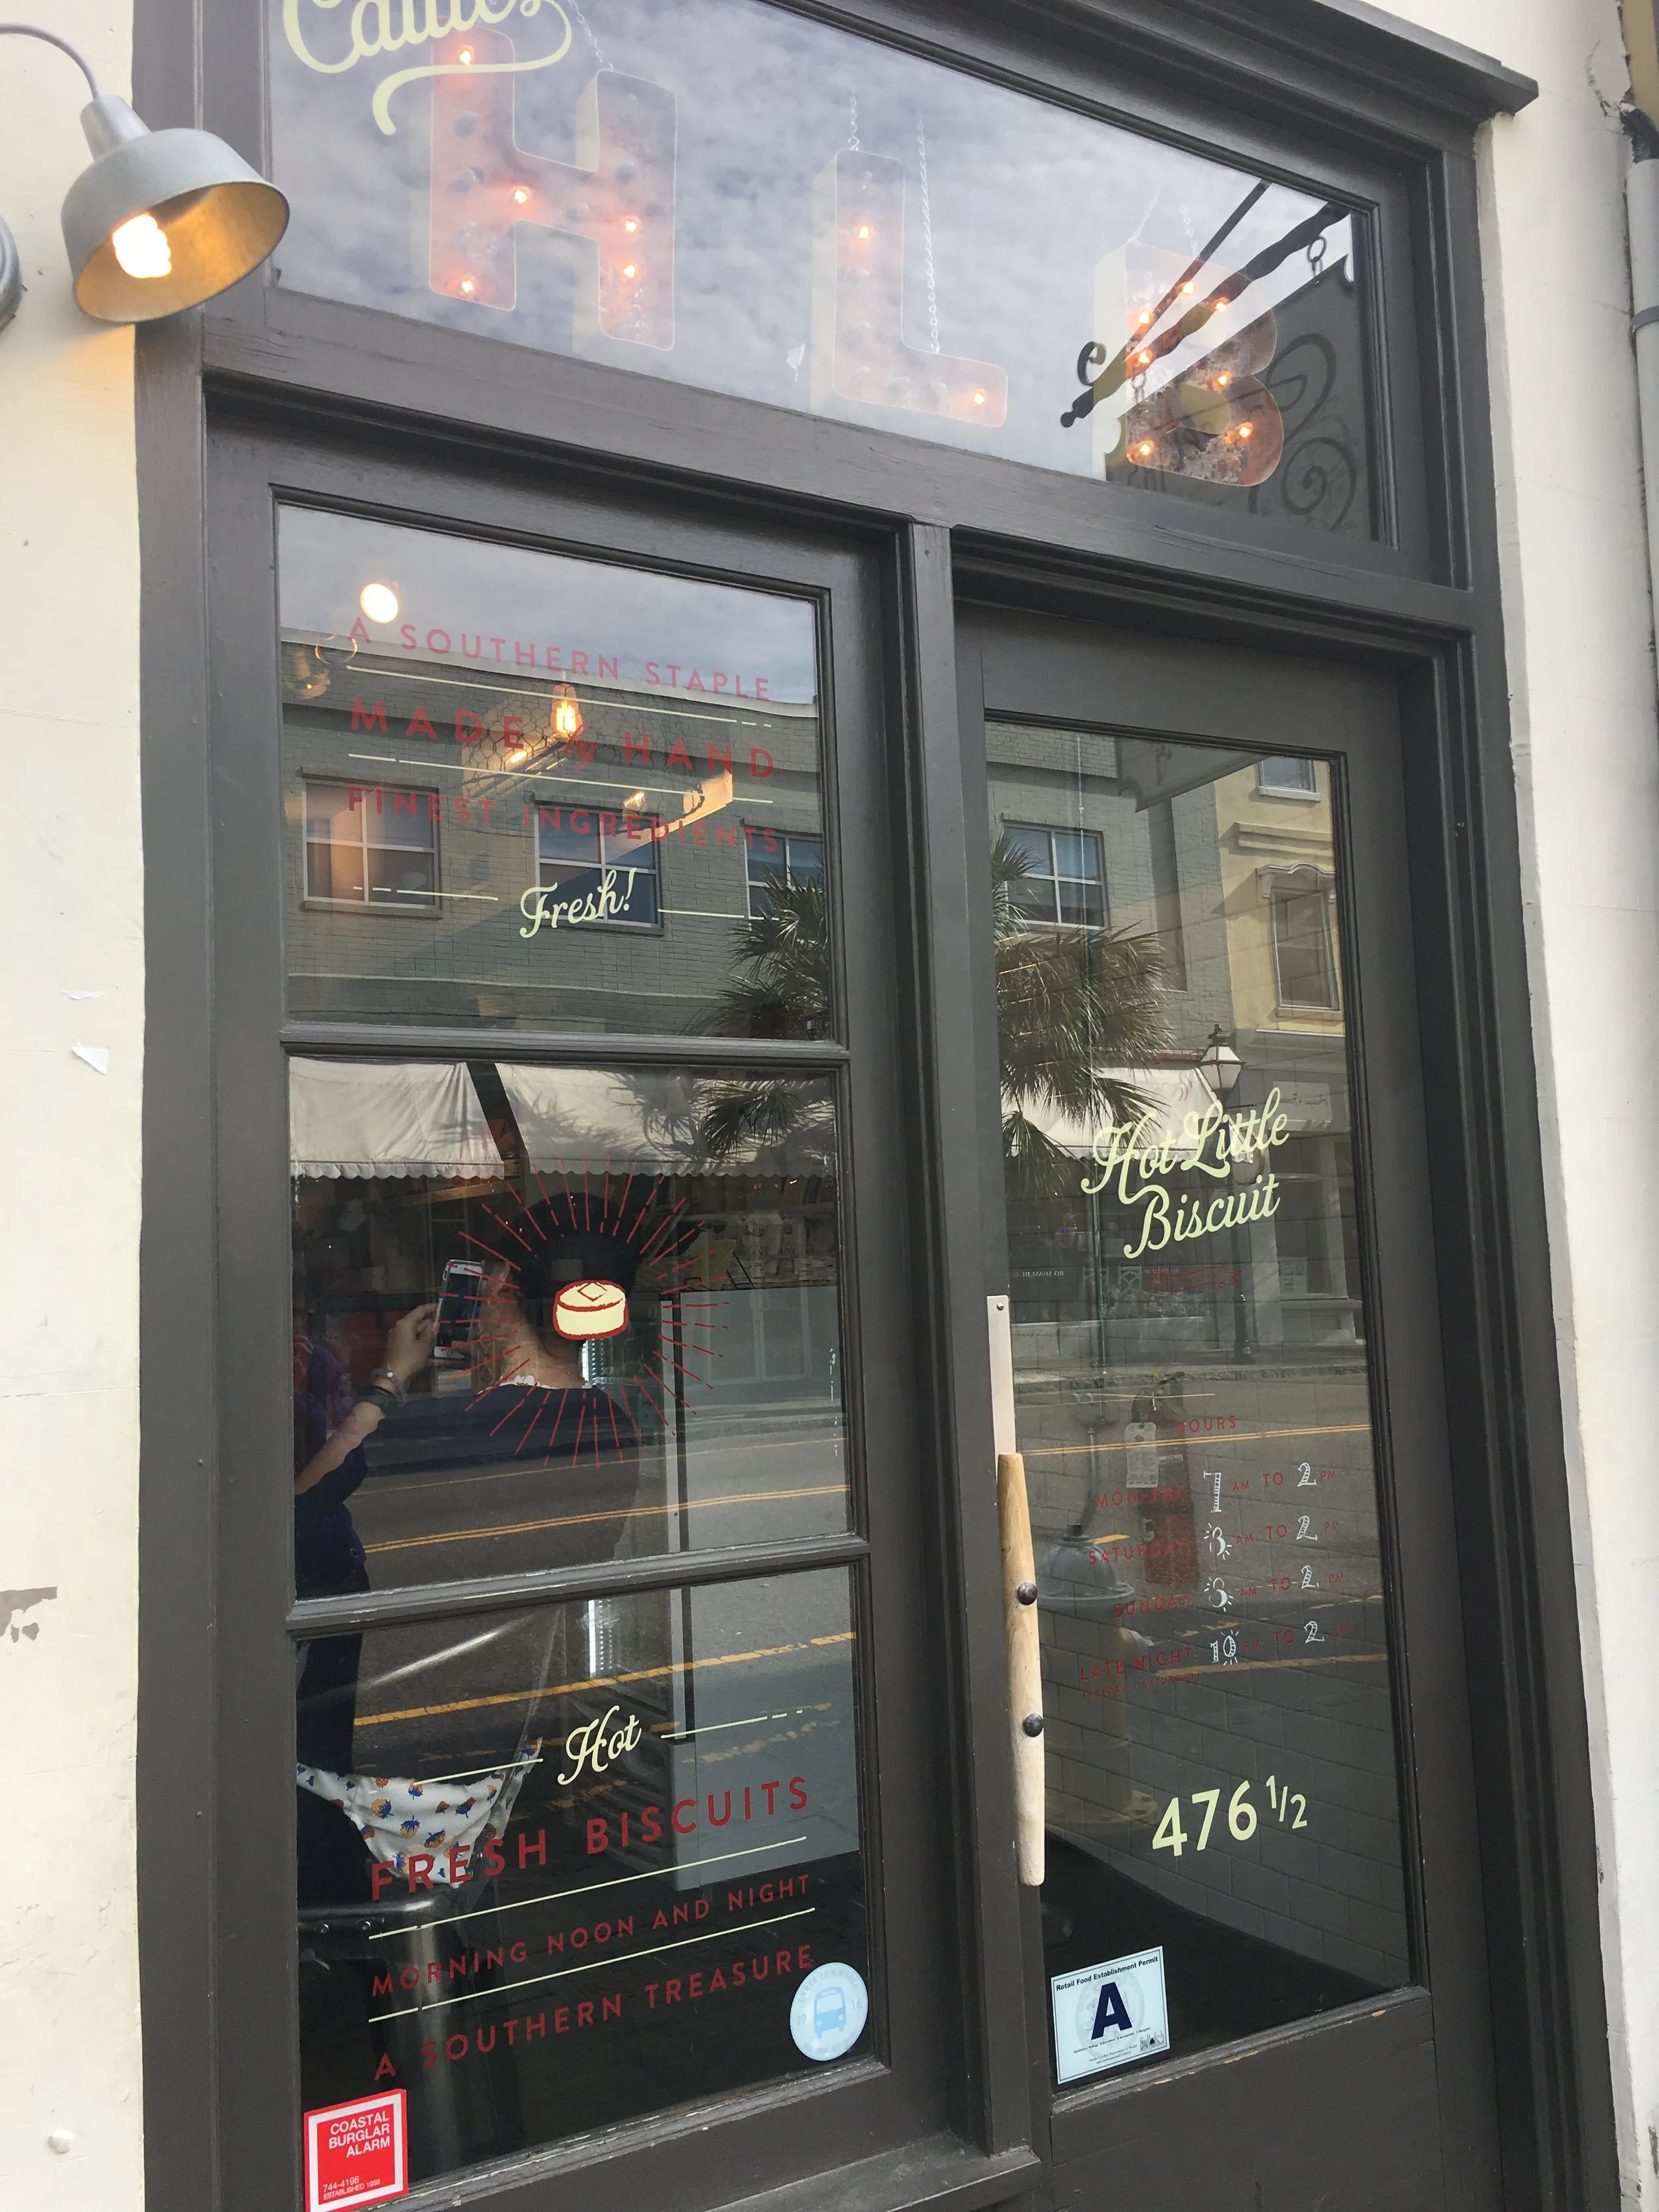
Of course this was the only picture I took of the place/actual biscuits!
After that, we walked down to the ocean where we caught the ferry just in time to see Fort Sumter. Fort Sumter was were the first shots of the Civil War were fired. It was chock full of history, but the best part (for me at least!) was the dolphins that rode our wake the entire ride back.
Once back to shore, we were starving and headed to 167 Raw. They are famous for their lobster roll, but the waiter we had suggested the scallop po'boy (as did the lady next to us!) and so I went with that. Best decision ever! One of the best seafood sandwiches I've ever eaten, and that's not a joke. Scallops were cooked perfectly (I'm not usually a big scallop fan due to the texture) and they were topped with beet reduction, some sort of green sauce (sorry - that's the best I can do!) and microgreens. The hubby and I shared some shrimp cocktail to start and he had a swordfish taco that he loved.

Scallop Po'Boy with beet reduction. On a perfecly toasted buttery bun. Heaven indeed!
From there we made our way to the Rooftop Bar at The Vendue. Enjoyed a few drinks (basil strawberry lemonade for me) and some good people watching. You could see the ocean from afar, and the weather was perfect. Recommend checking out if you're looking to soak up the sun and kill some time.
We continued walking from there and stopped to get some happy hour deals at Pearlz Oyster Bar. The hubby had 1/2 dozen oysters, pork rinds, and I had the corn fritters dusted with powdered sugar. The food was good, but nothing spectacular. Hubby loved the pork rinds (not my thing) and I enjoyed the take on corn fritters. Was a good place for a quick/cheap bite to hold us over till dinner.
For dinner we had reservations at Husk, the James Beard award winning chef Sean Brock's restaurant. Every ingredient is sourced from the South (even the olive oil is from Texas!), which was really unique for us. We started with some drinks (I had a non-alcoholic drink made with shrub which was fantastic) and the pig-ear lettuce wraps. They were mentioned as a must-try in Charleston, and the waitress recommended them as well. Although good, I couldn't quite get over the texture of pig ear (I also felt like my dog!) and wouldn't eat them again. However, it was one of those unique things you just kind of have to try!

Crunchy, salty pig ear lettuce wraps. By far the most interesting dish I ate this trip.
For the main course I ordered the pan-fried catfish with Carolina gold rice, and the hubby had the pork shoulder with pork belly inside. They were both really good, and really unique. The catfish was done perfectly and the husband drooled over his pork ("one of the best pork dishes I've had ever" - can you sense a theme going on here this trip?!).

Catfish and Carolina gold rice with a side of rapini.
Overall the food was a bit on the salty side for me, but my husband likes to remind me that I have a low salt tolerance (or so he thinks!). The dessert was my favorite part. Olive oil cake with local strawberries and fresh whipped cream. If you would have asked me before this pregnancy if I wanted dessert I would have answered "no, I'm not much of a dessert person". Boy how things have changed.

That cake was so perfectly moist and delicious. I am currently obsessing about how I can make a version of it here at home.

Outside Husk. Can't you just feel the Southern Charm oozing from this place?
Day 4 (Tuesday):
On our last day in Charleston we rented a car so we could take a day to explore on our own terms (and it was cheaper than taking multiple Ubers throughout the day!). Our first stop was breakfast at Early Bird Diner, which had been featured on one of our favorite shows: Diners, Drive-In's and Dives. I ordered the Chicken and Waffles and the husband had the biscuits and gravy. The chicken and waffles is what they are known for, as the chicken is drizzled in honey mustard dressing and the combo of the two are spectacular. Although the fried chicken wasn't as good as the Hot Tennessee Chicken we had at Poogan's porch, the combo of the dressing and the syrup was so scrumptious. The waffles were so light and fluffy on the inside and perfectly crisp on the outside. I don't order waffles out a lot, but these were some of the best.

Look at that plate of fattening goodness!
We enjoyed the biscuits and gravy more at Poogan's porch as well, just because this gravy was a bit on the thicker creamier side and we preferred the chunks of sausage in our gravy. Either way though, still a good taste of Southern home cooking.

Rich, creamy gravy atop light biscuits. There's even a homemade sausage patty buried under there!
After breakfast we made our way down to Folly Beach for a walk along the ocean and a stop for a drink at one of the hotel beachside bars. It was cloudy all day, but still magical for us to be on the ocean.
We stopped at Roadside Seafood to split a basket of fried shrimp and fried green tomatoes. I love fried green tomatoes, and both were served with excellent dipping sauces.
Finally, we headed back to our hotel to nap and get ready for our final meal at FIG (Food is Good), also known for their use of local seasonal ingredients. FIG was by far the fanciest place we dined at, and we were also the youngest people in there! It was one of my favorite dining experiences of the trip. We shared the ricotta gnocchi with lamb bolognese and beet soup with buttermilk and pumpernickel breadcrumbs. I had the seafood stew and the hubby the swordfish with orange, greens, and spiced granola (very unique - and very good!). We also shared the dessert with fresh strawberries (we kept having to order them as they were so good down there!), lavender shaved ice, and strawberry panna cotta. It was wayyyy too fancy in there for me to feel comfortable snapping any pictures, so we dined and chatted our way through the night without any distractions. HIGHLY RECOMMEND this place and making reservations beforehand.
Our last stop of the night was to catch some music at the Tattooed Moose. They are known for their duck club, but being we had just eaten, we split a side of duck fat fries with garlic aioli before leaving (definitely not needed - but worth it!).
And that my friends, sums up our 5 days in Charleston. It was a wonderful city filled with extremely friendly people, beautiful architecture, hard-to-believe history, delicious food, and a old-world charm you just can't find around here.
We will definitely be back. But until then, we'll be here. Enjoying the fresh snow and 30-degree weather. Is it spring already?!

Peanut Butter Chocolate Quinoa Granola (refined sugar free)
Happy Monday! Hope ya'll had a great weekend. We hosted a massive brunch on Saturday before we took to the frozen lake for some ice golf. The things you do for fun when you live in Minnesota during the wintertime...

We had 14 people play overall - with all proceeds going towards the local food shelf. Of course I'm the only one not looking at the camera. :)
Other than that, the hubby and I mostly relaxed on Sunday (and I may this delicious granola - keep reading!) as we were planning on attending a SuperBowl party at a friend's house last night. However, our little Aussiedoodle Tux, had different plans for us! Right as we were about to leave, Tux stole a sock out of the bedroom (I was finishing putting laundry away) and swallowed it. Off the the ER vet we went! Needless to say, not how we planned our Sunday night to go, but it is what it is. I'm hoping I'll be ready for the crazy things children thanks to him!
Ok so now on to the real reason for this post: Peanut Butter Chocolate Quinoa Granola (refined sugar free). Hello yum! Being I'm just about 22 weeks pregnant, I've had some major candida overgrowth issues (for those of you not familiar with what that is, google it). I was already prone to the infections that go along with it, and usually was able to nip them in the bud when if I started taking probiotics and laid off the sugar. Unfortunately, that didn't work being pregnant. Normally, I only eat one or two servings of fruit a day and hardly any processed sugar, but of course I've been craving sweets and sugar like crazy this pregnancy. Besides the medications my Ob/GYN but me on, I've been really trying to get back to reducing my sugar/carb/dairy intake (basically anything that yeast likes to feed on in the body!). This granola is still made with maple syrup, but it's much less sweet than what you buy in the grocery store.
Originally, I was making this granola into granola bars, but I think I over-toasted it and the poor things just wouldn't hold together! So, I crumbled it up and ta-dah! Granola. Deliciously crunchy, perfectly sweet, granola.
I've been on a big coconut-milk yogurt kick, and this granola is the perfect topping for my yogurt and fresh berries parfait. Coconut milk yogurt has barely any protein, so it's nice to get an added boost from the oats, peanut butter, and quinoa.
I hope you enjoy it as much as I am!
Peanut Butter Chocolate Quinoa Granola (refined sugar free)
Ingredients:
1 and 1/4 cups rolled oats (I used old fashioned)
1/4 cup oat flour or rolled oats finely crushed (I threw mine in the food processor for a few pulses)
3/4 cup unsweetened coconut flakes
1/3 cup uncooked quinoa
1/2 teaspoon salt
1/4 teaspoon ground cinnamon
1/2 cup dried fruit of choice
1/2 cup peanuts, roughly chopped (or other nut of choice)
3/4 cup dark chocolate chips (I like Lily's brand for no-sugar added)
1/2 cup peanut butter (or other nut butter of choice)
1/2 cup coconut oil, warmed until melted
1/4 cup maple syrup, agave, honey or other natural sweetener of choice
Directions:
Preheat oven to 350.
Lay parchment paper into 8 by 8 square inch pan (could also use 9 x 11)
Mix all dry ingredients together in mixing bowl.
Mix wet ingredients (oil, peanut butter, sweetener) in separate bowl.
Add wet indredients to dry and combine.
Pour granola into pan and press down in even layer with back of spoon or rubber spatula.
Bake for 20-25 minutes or until edges and top are starting to brown.
Let cool completely before crumbling into granola.
Store in airtight container for up to a week, or throw in the freezer for longer.


Peanut Butter Chocolate Bliss Balls
What's better than peanut butter and chocolate? Rolling them together in a ball with shredded coconut, muesli, and no sugar added! Yep, you heard that right - NO SUGAR ADDED. We can all rejoice in our post-holiday healthiness now. These Peanut Butter Chocolate Bliss Balls are packed full of nutrients and oh-so-yummy! Even my husband, who is sometimes skeptical of my 'kitchen experiments', loved them. Win win for everyone!

Here's what you need to make these perfectly creamy + crunchy + delicious bliss balls:
1 cup dates, already pitted (or you can squeeze out the pits yourself by soaking in water first)
1/2 cup natural no-sugar added peanut butter
1/3 cup dark chocolate chunks (I took a high-quality fairtrade dark chocolate bar and roughly chopped with a butter knife - you could probably buy pre-chunked chocolate from the store if you prefer). Health hack: If you're really looking to make these completely sugar-free, look for a dark chocolate that is only sweetened with Stevia.
1 TBSP flax seeds (could also use chia seeds or other favorite seed of your choice)
1/4 cup unsweetened shredded coconut flakes
2/3 cup muesli (or rolled oats work too, but I like Seven Sundays muesli as it has no added sugar)
Directions:
Place dates in mixer or food processor and blend until softened. Fold in rest of ingredients until combined. Roll into approximately 1-inch balls with hands. If having a hard time coming together, can add a little more peanut butter. Place on cookie sheet and freeze for 10-15 minutes or until set. Pop into mouth. Determine why you hadn't thought of making these before.
I stored leftovers in an airtight glass container in fridge. If you're like us, it wont take you long to devour! If it takes you longer than a week however, I would consider freezing them.
These are easy to grab-and-go, and make a great breakfast, snack, or dessert. Who knew a bliss ball could be so blissful?!
2017 Newsolutions: What They Are and Why You Need Them
“A New Year’s resolution is a tradition, most common in the Western Hemisphere but also found in the Eastern Hemisphere, in which a person makes a promise to do an act of self-improvement or something slightly nice, such as opening doors for people beginning from New Year’s Day.”
It's almost that time. The time for us to decide on what our 2017 New Year Resolutions are going to be. Maybe you don't make resolutions, or maybe you're like the majority of us who make them, and then don't end of following through with them anyway. I challenge you to take a different approach this year.
What if instead of adding more things you are going to DO this year, you take things off of your list? Wouldn't that make your life a bit easier? Simpler? Less stressful?
I'd like to refer to these as 'newsolutions'. Instead of adding more to our plate, we eliminate the things that don't make us happier or more financially free, or give us a greater sense of self or peace of mind.
What do newsolutions look like? Below I'll share a few examples that I am going to use in 2017:

1) No more coloring my hair. I made it through 2016 without this, and have decided I can continue on this trend. Not only is it a) healthier for my hair, it also b) saves me money. Not to mention, someone created hair color as a BUSINESS to make us feel inadequate with our own natural hair color, which is just a bit ridiculous (along with the rest of the beauty industry that we buy into!).
2) No more manicures. Again, I didn't get a lot of these in 2016 (if any!), but manicures are another thing that are a) not natural b) make my fingernails look like crap after it's worn off (shellac I'm talking to you!) and c) another drain of money. I will still be keeping my roughly once annual pedicure, as I do like to splurge and have my feet nice and soft before going somewhere warm!
3) No more involving myself in more than one activity at a time. If I'm coaching soccer, no teaching yoga or being on the bowling league (pretty much impossible to do anything else anyway!). If I'm on the bowling league, no joining any other organizations or teaching yoga (or they at least can't both happen every week!). Between work, my friends, my husband, our dog, and just life, over-commitment and over-scheduling is a real issue for me, and something I'd like to work on in 2017.
4) No more scheduling an event on both Friday and Saturday night. You know that feeling when you don't have a lot planned for the weekend? It's marvelous, isn't it? By not completely scheduling our weekend up in advance, my husband and I are able to have spur-of-the-moment adventures, either the two of us or with friends/family. Being able to do whatever we want (even if it is just to stay in, order Chinese food and watch a movie!) creates less stress and anxiety on the very few days we get off together. This is going to prove to be challenging at times, but I'm going to try and stick to it as much as possible!
5) No more gyms. Again, I pretty much gave this up in 2016, but the urge to join has came up now and again and I need to make it a 2017 'newsolution' as well. Instead of going to the gym, I use the Skimble Workout Trainer app, and love it. I can do short workouts at home every morning, schedule my trainings ahead of time, and even buy a specific program if I'm lacking motivation (for A LOT less than a gym costs!). The time it takes to go to the gym, workout, shower, etc., is too much for me. I weigh about the same as I did when I stopped going to the gym, and am in roughly the same physical shape (despite the pregnancy that is!). And for my yoga fix, I have the Yogamazing app, and Chad the instructor is great. He makes short 10-30 minute episodes based off certain topics (yoga for anxiety? check. yoga for weightloss? check. yoga for back pain? check. you get the picture!). Between these two apps and walking the dog, I get a good amount of exercise. If you love going to the gym or won't exercise without it, then by all means this should not be a newsolution for you. However, I challenge you to find more ways to fit physical activity into your everyday life. If you're ready to give up that membership, check out my article on how to do so: http://www.simplesliceoflife.com/blog/2016/6/23/how-to-give-up-your-gym-membership-7-easy-steps
6) No more NOT having a game plan. I just recently finished the book 'How to Train Your Brain for Success' by Roger Seip. It was a game changer for me. I loved the part about why you should never go into a week (or even a day!) without a plan, and Roger's strategies have helped save me countless of wasted hours throughout a week. It's definitely worth checking out if you're looking for a way to be more efficient with your time.
7) No more trying to accomplish more than 6 major things a day. This is from Roger's book, and I feel it's worth a mention. Roger states that you should never have more than 6 main objectives in a day that you want to accomplish. This keeps your mind focused, and prevents you from losing motivation by taking on too much. I've tried it for a few days now and love how it keeps me centered and energized, and not overwhelmed by the amount of tasks I feel I need to finish.
That's it! Well, at least for now. ;) The great thing about Newsolutions is you can set them, evaluate to see if they're working or not, and tweak as needed. What Newsolutions are you going to create this year?
5 Ways to Simplify the Holidays
Can you believe it? Thanksgiving is already three days away. If you're like me, the holiday season snuck up on you. Here in Minnesota, we've had exceptionally warm weather (up until last Friday!), so it didn't quite feel like November. But alas, here we are. Days away from the kick-off of the holiday season. And the stress/spending/overconsumption that comes along with it.
I started this blog as a way to document and share my ideas for living a simpler life. As I've been thinking about impending holiday season, I've started to reconsider what I deem 'necessary' during this time. I came up with these 5 ways to simplify the holidays. If you're looking to simplify your holidays, but can't/don't want to implement them all, start with one. You may find your spirits a little more jolly because of it.

1) Forget the Holiday cards.
This one is tough for me. Last year we sent out holiday cards for the first time (holiday + wedding thank you's!) and this year I was kind of looking forward to creating a card with a picture of our new puppy on it. I photographed him playing (or more like eating) a red santa hat, and even formatted the card online. But you know what I was thinking while creating it? That it didn't look as good as the professional photography cards that we will receive from a lot of our family and friends. And then you know what I thought? That. is. ridiculous. I haven't even sent/received any cards yet and I'm already comparing our non-existent card to others' non-existent cards. So, at that moment I decided to let the card idea go. Those who want to see a picture of our doggie can take a look on my Facebook or Instagram page (most everyone I would have sent to I'm connected with on those platforms) and the family who can't see him online will meet the little guy at Thanksgiving or Christmas. Also, I just saved us easily $100 by not sending cards. (That being said, I still love and welcome when other people send us cards, and proudly display all of our good looking family/friends when they do send!). Maybe in the future when we have children I'll want to send something, but for now, I'm saying no to holiday cards.
2) Go easy on the alcohol.
Now this is coming from someone who is currently pregnant (surprise!) so take it with a grain of salt. However, not being able to drink has made me realize how unnecessary a lot of my drinking was (especially during the holidays!). Now, I'm not saying you have to give up alcohol completely (what's the fun in that?!) but try putting some limits as to how much/when you drink this season (such as only having one drink at a party/out to dinner or choosing one or two parties that you will overindulge in, but that's it.) It's too easy to go on a eating/drinking/spending binge during the holiday season, so putting some restrictions around the boozing will likely leave your wallet and waistline smiling.
3) Give up the gifts.
*Gasp*. I can hear you all the way from here. This was easy for me, as my immediate family and I had given up gifts a long time ago (and even before that we bought/received pretty practical gifts - socks and shampoo anyone?). Don't get me wrong, I love receiving the unexpected gift (that I actually like!), but a lot of times the gifts I receive I don't need/use, and I'm thinking the gifts I give may be looked at the same. So what about gift cards or just asking what someone wants? Here's a novel idea. Just save your money to buy what you really want (or actually need!) and have that person do the same. Hang out with them, laugh with them, and let them know how much you value your time together. That is the greatest gift of all.
And if you're dying to give gifts or can't convince your family/friends to let it go, make a rule that gifts have to be handmade or locally made only, or do a fun white elephant exchange game instead (who doesn't like cleaning out their junk to give to the next person!?).
4) Limit the decorations.
Everywhere you turn these days, there are stands and shelves stocked with this year's decorations just waiting to be brought home. I'm guessing you have plenty of decorations from last year, but the pull of new, shiny decorations is hard to resist. My advice? Challenge yourself to not buy a single holiday decoration this year. Not one. You can make it through, I'm certain. We don't decorate much for the holidays except a little themed decoration above the cabinets in our kitchen, and a wreath on the front door. I'm not saying to not decorate if you love spicing up your home, but see if you can make do with what you have (or better yet, donate some of the decorations you don't like/use any more!).
5) Do one less thing.
Take a look at your calendar. Is there a party or get together you can say no to? I just looked at mine. Between now and the New Year, we've got three Thanksgiving celebrations, three Christmas celebrations, three birthday parties, one concert, one ugly sweater party, and a wedding. That doesn't include our respective work parties, or other random get-togethers we have planned. Today I had to decline an invite for a Friendsgiving I was looking forward to, but it fell on the same day as two birthday parties (and a play I'm attending earlier that day with a friend!). It may hurt to say no, but rushing from one party to the next on the brink of exhaustion doesn't make for a happy holiday season either. See if there is one thing you can cut out this holiday season and fully enjoy the things you do participate in.
“Use it up, wear it out, make it do, or do without.”
Let's not lose sight of what's really important this holiday season. It's not the parties, the gifts, the drinks, or the food. It is about spending time with the people we love, practicing gratitude for what we already have, and giving a little extra to those who need it.
How to Make A Magnetic Wall Spice Rack for Under $40
Please note that this post contains affiliate links, which means that if you click on one of the product links, I’ll receive a small commission. That being said, I only recommend products that I use and love, and hope you'll use and love too!
Does your spice cupboard look like this:

Like finding a needle in a haystack.
If so, you are like the majority of us.
When the hubby and I were registering for gifts for our wedding, we decided we really wanted to have a magnetic wall spice rack for our kitchen (see picture above for reason why!). We received the spice rack tin, but never any of the magnetic spice tins. When I went to go buy them myself, I realized that they were SUPER expensive (roughy $2-3/tin). I was hoping for roughly 20-24 tins, and if you do the math, that really adds up.
So what's a girl to do? Figure out how to make some magnetic tins of my own, for a fraction of the cost.
Here's how I did it:
Step 1) Buy a magnetic tin wall base. My husband and I registered for this one, and have been quite pleased:
Step 2) Find some containers to hold your spices in. I found a pack of 6 favor tins at Hobby Lobby for $3.99, annnndd they were having a 50% sale. I ended up buying 4 packs for roughly $8. Score! Side note: make sure that the tins say 'food-grade' on them (or something similar stating they are suitable for food) and that you wash and COMPLETELY dry afterwards (very important for when we get to step 5!).
http://www.hobbylobby.com/Party-Baking/Themed-Party-Collections/Baby-Shower/Round-Favor-Tins-with-Clear-Lids/p/57651 (not an affiliate link)
Step 3) Buy some magnets. I bought these at Hobby Lobby as well and have plenty of leftovers for other projects.
http://www.hobbylobby.com/search/?text=magnets&quickview=25769 (not an affiliate link)
I bought glue thinking I would affix the magnets to the containers, but it ended up being unnecessary. I can just grab the container off the magnet and put it back up when done using.
Step 4) Create labels for your spice tins. It will be virtually impossible to differentiate between some spices and herbs once in the containers, so this is a MUST DO! It will also help keep direct light off your spices, which can damage them.
I bought Avery labels product number 22807 (2" Print-to-the-edge-round-labels - see below to buy on Amazon!) and then customized them on their site (they cost $8 and you will only use 1-2 sheets out of 10 depending on how many tins you want). I went with the black chalkboard-looking design with the cute cursive print. Just type in the names of which specific spices/herbs you'll be using, format to print and ta dah!
Step 5) Affix labels onto tins. You will want to make sure both tins and covers are completely dry or your labels will get ruined. Also- try not to touch labels with wet hands in future as the ink will smudge.
Step 6) Fill tins with spices/herbs. Be sure to not overfill.
Step 7) Place magnets on board, place tins on magnets, and you've got yourself a magnetic wall spice rack (for less than $40!).
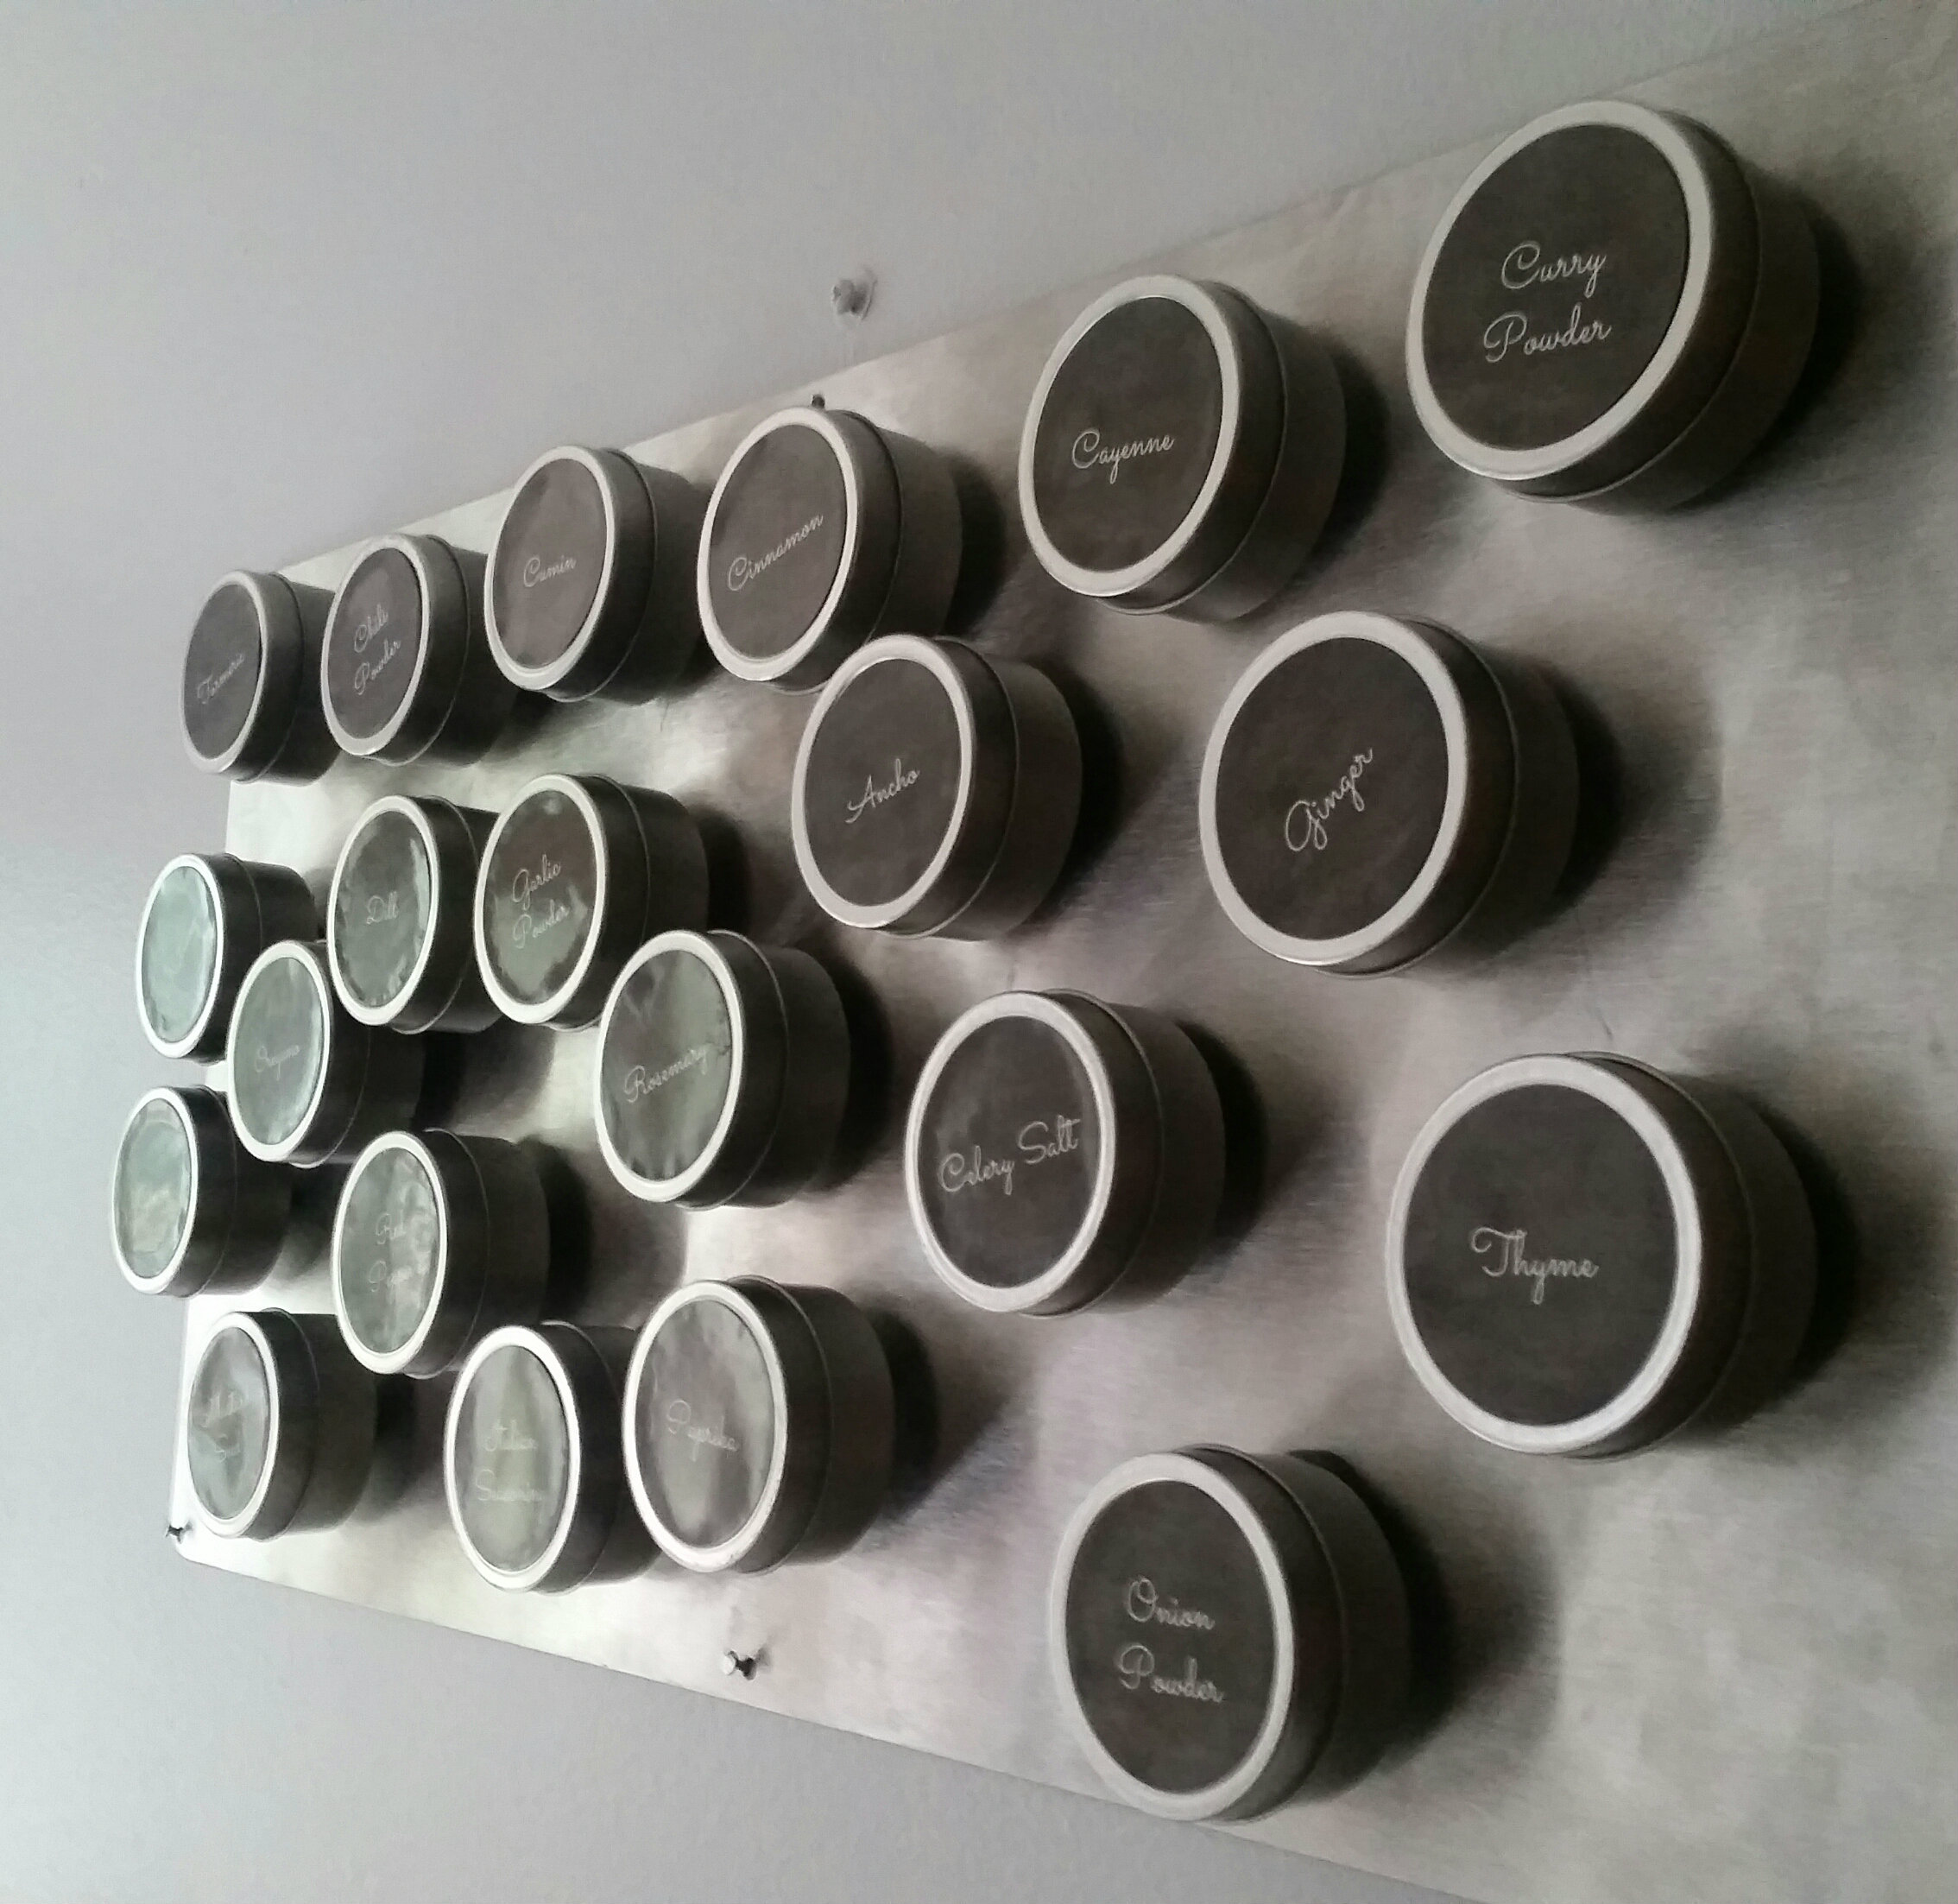
No more frantically digging through the cupboard to find the spice I need!

The Easy Way to Start a Vegetable Garden (hint: just do it!)
“The journey of a thousand miles begins with one step.”
Early this spring, I decided that I wanted to start a vegetable garden. I had no prior experience with gardening, except the few herbs I have grown on the windowsill.
I didn't read any books on vegetable gardening, figure out what crops grow best together, study the pattern of sun in our backyard. Nope, I didn't do a lick of research. I just jumped right in! A lot of times, it's important to do your research before making a decision. However, sometimes you need to JUST.DO.IT. And that my friends, is exactly what I did. How did I do it? Read on...
Step 1) Determine where you are going to put your garden/dig it up
For us, there was a patch of flowers alongside the west side of our house that I dug up but left the pavers in. You could also put in a boxed garden, although you'd have to take the extra step to build the box.
Step 2) Get some dirt/compost
After your dig up your garden patch, you may have to add some dirt. I recommend adding a few inches of compost (you can buy at a local garden/hardware store or maybe get free through your city/county) to bring added nutrients to your soil.
Step 3) Buy your seeds/seedlings
Rather than starting with seeds, I bought a few seedlings from the farmer's market and an urban garden store. Zucchini, yellow squash, strawberries, butternut squash, cauliflower, broccolini, onions, hot peppers, sweet potatoes, Brussels sprouts, two types of kale, cucumbers and asparagus.
Step 4) Plant your seedlings (after the possibility of a frost disappears)
Again, not a lot of rhyme or reason to where I planted things. I ran out of room in my garden so decided to grow my zucchini, yellow squash and cucumbers vertically in pots (it was a fail, as I forgot to punch out the drainage holes in the bottom, and completely flooded my plants - I also think you need to have large enough pots which I did not) and the butternut squash went in a different spot where we tore out an old fire pit. It is recommended that your plants that grow taller are not going to shadow your smaller plants, but again, I just read the directions of how far they should be spaced, grabbed a measuring tape, and went to work.
Step 5) Protect your plants
I put up a small fence around my garden to try and keep the rabbits out. Also - did you know that squirrels LOVE strawberry plants? I surely did not. We got about five strawberries out of the plants before the squirrels took over. Next year I will plan on covering the plants so the squirrels can't dig them up!

My very first strawberry!
Step 5) Weed and water
In the early weeks, it's important to keep your garden weed-free and watered (I've heard of some people putting down mulch for weed protection, or newspaper on top of the grass works for boxed gardens). I made sure to swing out there every day or every other, to pick a few weeds, and give it a good water (5 minutes or so - depending on how much rain we had recently gotten). The weeding will really pile up if you aren't consistent!

My vegetable garden. In all its glory.
Step 6) Reap what you sow, and then let the rest go
I had a TON of success with the broccolini (if you tip them over, the side shoots activate all summer long) kale and hot peppers (the asparagus is looking good for next year too!), but only got one cauliflower (out of 6 planted), zero sweet potatoes (that I can find), and the Brussels sprouts are struggling. The point? It's your first year. Enjoy what worked, and let go of what didn't! Also - Google is great for determining what to harvest when. :)

Kale and peppers and broccolini - oh my!
And that's how you start a vegetable garden. Until next time, I'll be trying to cool my mouth from all those hot peppers.
And next year, I'll be making a bigger garden.


